Two weeks ago, I sat down and filmed myself as part of a job application. It took me a million tries, and I even ended up explaining that I am a lot better behind the camera than I am in front of it. I feel safe behind the camera, I feel way more in control. Being in front of it, however, is a whole different situation. When I finished filming that application (and editing it to make my thoughts sound 10 times more coherent), I vowed to stay away from the front of the camera in the future.
Flash forward two weeks, and somehow I ended up in front of the camera again. Yesterday, someone from ICTV emailed me asking me to do an interview for their women in media episode on News Watch. I know how stressful it can be finding interview subjects, so, despite my two-week-old vow, I happily obliged.
This was unlike anything I had ever experienced before: the script was completely switched. Instead of conducting an interview, I was the interviewee. It was like my mind went blank as soon as the camera started rolling, yet at the same time thousands of thoughts were running around like crazy. How should I answer this question? What answer is he looking for? Am I talking in circles? How is he going to edit this together? What is the final product going to look like? Am I even answering a question right now?
Maybe other people don't think that much about an interview while they're participating in one. Maybe I was just hyper-aware because I'm so used to being on the other side of the camera. Regardless, I think it was helpful being in the hot seat for once. Now that I've been in front of the camera, I have a better understanding toward how my subjects may feel. It's easy to have expectations as an interviewer, but I think that understanding what it is like being an interviewee is important in order to make those expectations a reality.
Maybe, in order to be even better behind the camera, we should spend more time in front of it as well.
Showing posts with label camera. Show all posts
Showing posts with label camera. Show all posts
Thursday, March 10, 2016
Thursday, October 22, 2015
What would you do to get the shot?
When it comes down to it, it's not about what camera is used to obtain a shot but what the actual shot is of. Many filmmakers go the distance by sending their cameras into the air, under water, or even attaching it to their pet. But this filmmaker has to take the cake. Having stumbled upon a rattlesnake pit, they attached their GoPro to a stick and dove in to receive some amazing footage.
It felt like a horror film as they began to attack the camera, but nonetheless the technology that we have at our fingertips these days is what enables this sort of filming making. A camera attached to a stick is all it took to enter this rattler nest and that hockey stick is what also enable the filmmaker to get it out after it fell off its mount.
It's because of the accessibility of this sort of technology that results with these immersive videos. It makes you not only wonder if the camera operator is crazy but also how you can take a simple set up and capture something brilliant. You won't be finding me near a snake pit like this anytime soon but I definitely will take the concept of this video and apply it to my work. Live the moment and think outside the box because this may just be the reason you walk away from a day of filming with a viral video.
Wednesday, September 23, 2015
The new RED Raven
RED has teased at it's newest camera, The Raven, and will be announced September 25th. It is currently rumored to shoot 4K at 120 FPS and has built-in WiFi.


Most of the information currently known is based on speculation, leaked information, and leaked photos via employees and the president at RED. The raven will most likely feature a fixed mount, which fans are speculating will be an EF mount. From the above picture it is likely that the Raven will take mini-mags for media storage.

Based on announcements from other companies, fans are guessing that the Raven will come at a price point of under $10,000 (body only) and will be replacing SCARLET MX. More information will be released on Friday during the official announcement, but until then, speculation will have to get your fix.
Thursday, August 27, 2015
Nightfire: Filming in Verona, Italy
While many of you may have either seen the trailer, or even the full film, Nightfire is probably a talking point you've heard about when hanging out in the Park School. I was lucky enough to travel to Verona, Italy this past January to work as the 1st Camera Assistant for this thesis film. It was a great opportunity to work on a professional run set with amazing actors, crew, and of course gear. Oh, how I miss that gear.


Battery life was short lived and like most sets we needed a charging station. Sometimes it was a room indoors located on set, other times it was out of the back of a van or running off a generator.


Now as demonstrated in the trailer above there were some quite intricate scenes that occurred throughout the film. From bike chase scenes to explosions, every day was an adventure to say the least. But you must know that this film wasn't made over night, well yes we constantly shot through the night, however, the production lasted 3 weeks and most days we worked for 16 hours with the occasional all nighter shoot. Well choreographed shots and blocking was the name of the game, because when explosions and special effects come into play there are only so many takes you get before you must move to the next shot.

(16mm ARRI Ultra Prime used with the Red Dragon.)
As 1st AC I was in charge of everything from making sure batteries were charged before we went on set(or right before the next big explosion), calibrating our DJI Ronin, even making sure the DP was out of bed in the morning. Now while I look back fondly on this trip, there were some serious road bumps we ran into across the way.

(View from the watchtower located on the set of the military base.)
First off, the weather. We were filming in the middle of winter in northern Italy, seeing the Alps as we drove to set became a normal part of our day and it was a clear reminder of the winter cold. Not only did you have to bundle up before venturing to set, but we had to make sure the electronics would work properly.

(Director of Photography, Garret Nicholson, preparing a shot on the Jib)
The entire film was shot on the Red Dragon which had quirks we constantly had to deal with. The first thing to know about Red cameras is that to have a clean image at higher ISOs you must perform what is called "Black shading". Black shading is the process of obtaining the functioning temperature of the Red. Typically this rests around a 45/65 split. There are two temperatures of the camera as you can see in the picture below.

To perform a black shade you will wrap the camera in a sound blanket or jacket, whatever is around really, and ensure that no light is getting to the sensor. It takes about 20 minutes but this will eliminate any grain obtained through high ISOs. However, after the one black shade is run, the camera needs to stay at that temperature of 65/45 (a few degrees off doesn't hurt). With the cold affecting the camera we would always have to have the Red otherwise the camera would drop below operating temp and the grain would trickle back into the shot.
Battery life was short lived and like most sets we needed a charging station. Sometimes it was a room indoors located on set, other times it was out of the back of a van or running off a generator.

(DJI Ronin)
Due to the calibration needed for the DJI Ronin's 3-axis gimbal we were forced to used RED volt batteries. To ensure smooth movement from the rig we had to have perfect balance and the larger batteries would not cut it. These RED volt bricks only last about 30 minutes when the weather is warm, so when the cold was added it was cut down to 15 minutes at best. To keep the volts warm we resorted to holding onto batteries beneath our long johns and armpits.
When using a tripod the larger Anton Bauer V-mount batteries were able to be used, but the majority of the film was shot on the Ronin so we had to troubleshoot this problem. When we were constantly running around I would carry the V-mount adapter. After we completed a shot we would set the Ronin on it's stand and plug the AC power adapter in and prepare for the next shot. This was a huge stressor of the trip, since the responsibility of battery master fell upon myself. However, having the AC power truly helped our situation.

Another issue we ran into was difficulties with the wireless follow focus. Due to the cold and issues with the receiver the follow focus would not deliver it's signal. We tried everyday to get the follow focus to work but still struggled to find the solution. In the end we had to just close our iris, cross our fingers, and keep our distance. The follow focus would have been an extreme help, especially for the long tracking shots the movie had. It just goes to show you never know what will happen on set, but you better be damn ready to work around anything that gets in your way.

(Paul Wolter getting Wild)
Overall, I had the time of my life. Being able to travel across the world for film is something I want to continue to do for the rest of my life. I met amazing people, learned so much about the filmmaking process and how to become a better DP, and the wine made up for any sort of mishaps we had on set during the day. There is so much that I took away from this project but I'd have to write a book to do explain it all, so until then this will suffice. Until next time.
Tuesday, February 3, 2015
The Background of White Collar
One of my favorite shows, White Collar had its season finale just over a month ago. Throughout the six incredible seasons, we watched the characters grow and the story unfold. An aspect of this show that I thought was amazing was the beautiful background of New York City. They creatively use the city as a source of visual language. Having a constant city background can get monotonous at times, but this show executes it flawlessly.
 There are so many lovely shots within each episode that sometimes you feel like the characters are inside a work of art. I find this ironic since the main character, Neal Caffrey, was originally in jail for art theft and forgery. Many of the shots used throughout the episodes are wide shots that show the beautiful architecture of New York City and it gives off such a powerful dynamic.

White Collar Director of Photography, Russell Lee Fine, explains that "The way I've built White Collar is to be super fast…We match our A and B cameras on set. I know I can set the cameras here and there, and rehearse it once, and know I can correct on the fly. Sometimes we don't rehearse at all." The way that this show is set up makes the setting stand out even more. Since it as set up to be super fast, the dynamic of New York City adds to the chaos of the show. Fine also stated that, "we do absolutely no lighting on exterior streets." This means that they rely on the sunlight and the cameras to film in natural light in the daytime. The cameramen for this show are also always on dollies and move quickly with the pace of the show. Overall, the setting of New York City contributes greatly to the show White Collar and the decisions that Russell Lee Fine decided on really enhance the outcome of the episodes.
Friday, November 21, 2014
New 8 mm Camera
For the first time in over 30 years Logmar Camera Solutions plan to release a new and improved 8mm and 16mm camera. And for many this wouldn't be that big of a deal but this isn't just a vintage camera that you can buy at a antique store. The Pro8mm can record high quality sound through a XLR input that can be recorded on an SD card directly on the camera.

The camera comes with video output, actual 48v Phantom Power, and is usb upgradable. This is really great for those looking for that 8mm or 16mm look but can record sound and do many advanced things that the old cameras couldn't. The camera is scheduled for release in December and is going to make a little hole in your pocket with it's $5,000 price tag.

The camera comes with video output, actual 48v Phantom Power, and is usb upgradable. This is really great for those looking for that 8mm or 16mm look but can record sound and do many advanced things that the old cameras couldn't. The camera is scheduled for release in December and is going to make a little hole in your pocket with it's $5,000 price tag.
Wednesday, September 25, 2013
My sheer excitement for our final project!
After we get past this scene recreation project, we're moving immediately on to our final project. What? Are you kidding? That's ridiculous! Yeah, it is. It's ridiculously awesome! I could not be more excited to start working on the project as soon as possible.
To begin, I'll be working with the group focusing on the poem about a man's struggle with OCD. I personally think it's a very interesting story with which countless artistic, creative things can be done in the film medium. I'm not exactly sure which direction our group will head in with portraying the story, but being able to take a person's personal story and shape it in our own way will be an experience which I haven't experienced before. At least I think I haven't. The groundwork is laid down for us, but now we have pretty much as much freedom as we need to do whatever we want with the story.
Here's the poem...
In addition to the actually story we're presenting, the group of people I'm working with also attributes to my level of excitement for this project. Having worked with a few of my group members in the past, I know that they are very dedicated, creative people who certainly know what they're doing. For those in the group who I haven't worked with before, I have complete and utter faith in their work. While I may not have worked with most of the group before, I've seen some of their work, and as long as they match--or maybe even surpass--what I've seen of theirs in the past, I'm absolutely positive I'll be blown away with their work this year. During the few discussions I've had with some of my group members, I can already tell that they all have some great ideas for the production, as well. Also, it's simply a wonderful group of beautiful people.
Here's the best part. Some people would argue that a larger group project is too difficult a thing to do. They'd say that it's simply too complicated and annoying to work with so many people and to plan around so many different personal schedules. Forget them. They're wrong. Can working with a larger number of people be more complicated than working with fewer? Yes. I'm not saying it's not, but the extra complication certainly comes with its benefits. Think about it. Unlike last year where you'd have 3 people in a group where everyone helped with everything, each person can now be assigned a specific job in the production. Instead of having 3 people crowded around one table while writing the script, drawing out the storyboards, or editing, one person will do each of these things. It takes the complication out of everyone worrying about everything. Now each group member can focus their complete attention and effort towards their part of the project. That's not to say that every member won't help one another with each step of the production process, but each member will now be able to focus on the certain part of the production that they love to do and excel at. As long as everyone does their job, it'll work out much better than in the past. Just wait and see.
Let's not forget about the equipment. I mean, seriously. These new cameras we get to use are unbelievable compared to the ones in the past. They're quality pieces of equipment! They're able to do things that the JVC100 were never capable of doing. I couldn't have even dreamed of something so wonderful. They can shoot in slow-motion! How cool is that?! I could go on for hours about the FS100's features but I'd probably bore you. I really just wanted to bring it up and emphasis all of its awesomeness.
I cannot wait to get started on this project. I'm hoping--and planning--on finishing with a product that I'll want to show to everyone I know. Let's go Los Jalepeños! Or El Dorado? We haven't quite decided on a group name yet...
Friday, September 20, 2013
MŌVI: The Future of Filmmaking
As I sat on my porch today enjoying the nice sunny weather, my roommate came out and showed me this new piece of technology made by FREEFLY.
Link to their homepage.
MŌVI (pronounced moe-vee) is a camera rig that breaks the process of cinematography into two pieces. Normally, the camera operator is focused on framing, focus, and the general movement their body needs to make in order to get the right shot. This can be very difficult, especially when you want a panning shot of someone in a car or someone running down the street. The steadiness of a camera can really define a quality film. With MŌVI, the process is broken up between two different operators. One is focused on getting the camera where it needs to be, and the other is concerned with framing and focus. How does this work? Think of it as advanced remote-controlled steadicam. They have a few demo videos that explain it best.
The taxi shot they get about 3 minutes into this clip is incredible. To get a shot like this in the past you would need a substantial budget with several camera operators. They had two operators and a pair of rollerblades. Amazing.
These rigs are not available to the public yet, and pricing has not been set. They say they will release them in the 4th quarter (October-January) and they probably wont be cheap.
You can sign up for their newsletter to get updates and other information here.
I would consider a purchase like this a heavy investment that would pay off in the long run. If you put it to good use, you could probably compensate the price of the rig after just a few effective shots.
This second video goes even further into the possibilities of their products, especially the CINESTAR, a helicopter-like rig. We will probably have to be ready to drop several thousands of dollars for any of these products... but holy crap what a payoff. I myself will probably not be ready to purchase something like this for a while. But if anyone else is, let me know! I may want to borrow it. You know... if that's cool.
Friday, September 13, 2013
Filming Style of Arrested Development
Like many people I am a huge fan of the TV show Arrested Development and when Season 4 came out, I decided to re-watch the first three seasons and noticed something interesting. There is a very distinct camera style that is used during the show. Almost the whole show is shot handheld by someone who is a little too shaky. Here is a clip to show you what I mean.
The dialogue scenes seem to be entirely shot by cameras on shoulder mounts using fast paced zooms and pans. Normally people discourage this kind of filming because it feels somehow sloppy but for me, it somehow works for the show. Here is my theory on why. For those of you who haven't seen the show first off... watch it... secondly it is about a man named Michael Bluth who is forced to take over his family affairs after his father is put in prison. However the rest of his dysfunctional family make his job unbearable. This is why I think the show is shot so frantically, it is supposed to represent how frantic each episode is. Every episode Michael needs to overcome some obstacle being put up by someone in his family. Since Michael is the protagonist I think that maybe the camera represents how frantic and unorganized his job is.

Well anyway that is my theory on the interesting camera style for Arrested Development please comment if you have any questions.
Thursday, September 12, 2013
Techniques of Filming
Recently I've been interested in simple techniques that increase the quality of the shots when filming. I found a decent article posted by lavideofilmmaker.com called "11 Essential Film Techniques". There's definitely an emphasis on the world essential, because the first 8 or so are some very standard techniques such as zoom, pan, tilt, and over-the-shoulder. Assuming you guys already know about most of these techniques, I'm going to focus on the last two. However, if you want to read the full list you can check it out here:
http://www.lavideofilmmaker.com/filmmaking/film-techniques.html
Number 10 is called the Dutch Angle shot. You may know it as the sideways/crooked shot.


Number 11 I also found very interesting. They labeled it as Mixing focal lengths in a scene to make one character dominant over the other. Normally, you want to use the same lens in a back and forth conversation to keep the shots similar. However, there is one exception to this. I could reword it in some way but they really say it best:
"If two characters are talking and you cover the scene with complementary over-the-shoulder shots and you want to make one character look a lot more dominant than the other, you can use a wide lens (short focal length) when shooting over the shoulder of the dominant character, and a significantly longer lens when shooting over the shoulder of the other character. As a result of the short focal length, when you film over the shoulder of the dominant character, he will dominate the frame because he will look much larger than the other character."

http://www.lavideofilmmaker.com/filmmaking/film-techniques.html
Number 10 is called the Dutch Angle shot. You may know it as the sideways/crooked shot.

This shot is rarely justified, but when it is, it works beautifully. Dutch angles are used to create a sense of unease with the viewer or suggest that something is out of balance. This makes sense because the shot is quite literally out of balance. Wikipedia claims the first film to use this kind of shot was a 1919 silent German horror film called "The Cabinet of Dr. Caligari". Today, Dutch angles are quite popular and we can point them out in several films and TV shows. They were also extensively used in the 1960's Batman TV series (I mention this only because I talked about this show last time).

"If two characters are talking and you cover the scene with complementary over-the-shoulder shots and you want to make one character look a lot more dominant than the other, you can use a wide lens (short focal length) when shooting over the shoulder of the dominant character, and a significantly longer lens when shooting over the shoulder of the other character. As a result of the short focal length, when you film over the shoulder of the dominant character, he will dominate the frame because he will look much larger than the other character."

I found this to be a very artistic use of the lens. It's also a good example of learning the rules like a pro so you can break them like an artist (hats off to Picasso for that line). Anyways, I hope you find these techniques interesting and I invite anyone to comment with interesting techniques they've have found!
Friday, November 30, 2012
Learning Time-lapse Photography
Over the years I have always seen and been interested in beautiful landscapes and architecture in film and documentaries. Often times in documentaries these shots incorporate a time lapse to add to the beauty of the shot, visually show the passage of time, or to just add to the film's aesthetic. Recently I decided that I wanted to learn how to do time-lapse photography/motion sequences.
Although it is possible to create a "time-lapse" using a camera's video mode and speeding it up in post it is not the most professional way. I have found that in order to observe motion blur and to perform in low light areas taking still photographs creates a better end product.
What You Need:
-A Camera
-A tripod
-An external timer
Once you find a location you want to shoot you must set up your tripod exactly the way you want it and make sure it does not move. Next adjust you're camera settings. (since you are in photo mode you can adjust shutter speed below 1/30 to allow for motion blur). Next set your external timer to the interval or rate you want your pictures to be take. The interval you set should be directly related to the style you are interested in shooting as well as the speed at which what you are shooting is moving. Some general guidelines for hows long of an interval to set are as follows:
1second intervals for moving traffic, fast-moving clouds, and driving.
1-3secs intervals for sunrises and sunsets, slow moving clouds, crowds of people
15-30secs intervals for shadows, the sun moving across the sky (with no clouds), and stars in the night sky
90-120seccs intervals for fast growing plants
5mins-15mins intervals for building construction
How long these intervals last should be related to how long you want the finished product to be. In order to find out how long you need to shoot for to achieve your finished product there is a simple calculation.
How long you want your final product to be (in seconds)
X(multiplied by)
The rate you want to play the clips back (fps)
= the number of shots you need to take
then take this answer ^ and multiply...
The number of shots you need to take
X(multiplied by)
The time interval between each shot you set
= how long you need to shoot for
An example:
If you want a 15 second clip played back at 30fps with an interval of 2seconds between each shot. How long will it take you?
15 x 30 = 450
450 x 2 = 900seconds (the time it will take to shoot this scene)
900/60= 15mins
So it will take 900seconds or 15mins of shooting to get the end result you want.
After learning the basics for time-lapse photography I look forward to employing what I have learned in order to make more powerful and dynamic shots for future projects.
Thursday, November 29, 2012
Color correction for the color blind!
Look at this picture below:
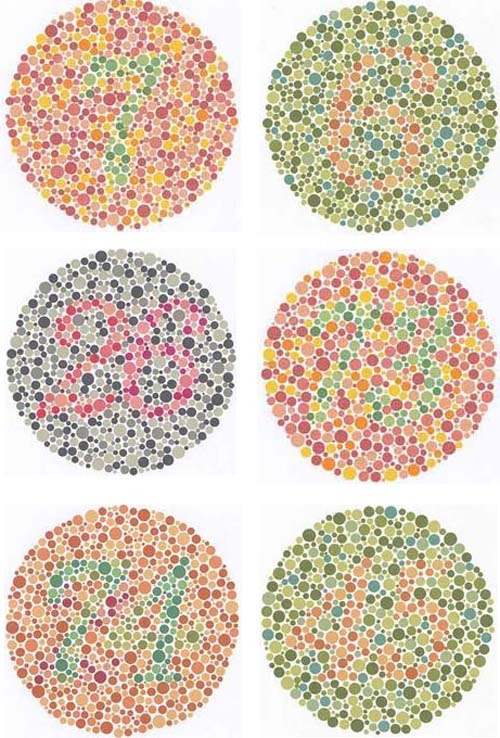
If you were unable to see one or more numbers hidden in the big circles, then congratulations! You are most likely colorblind. The number should be apparent.
If you are colorblind and in denial, this is the size of the numbers that you should be able to see.

So you are color blind, and if you work with photography, including video, this can be a major problem. Why? Well if you know how a camera works, you'd know that there are different light temperatures depending of the source of light that the camera can pick up more than our eye does. This results in different color tints on the picture than you want. And for a colorblind person it can be difficult to tell if the color os off, and how far off it is.
But have no fear! Someone found a way to color correct photos, even for a colorblind person in post-production. Colorblind photographer Chris Nicholson has developed a way to be able to color correct photos for colorblind people.
It is a little time consuming, but considering how much it can enhance/save a photograph it is completely worth looking at. This especially becomes true when it is used to earn a living. So from one colorblind person to another, thank you Mr. Nicholson, and I recommend everyone to check out this tutorial.
Friday, November 9, 2012
Final Project
I think everyone is going to enjoy completing their final project mainly because of the freedom involved with it. We can choose our own topic (more or less) and there is a lot of independence from pre prod to post prod. One thing that will be good for everyone is having set position so that everyone knows their responsibilities and what each of us need to do. People can help out with other departments but for the most part, camera will stick to camera, sound will stick to sound, and so on and so forth. That lets everyone focus more on their part of the project as opposed to wearing multiple hats and trying to help write while you make a shot list or plan out locations, etc. That may make it stressful for a person to coordinate a lot, but it will definitely make the project better in the end.
We all came here to learn how to make films and doing a final project like this, culminates everything we have learned thus far. We can all learn from each other as well. Of course there will always be more experienced people and less experienced people on set. But that works in everyones favor to teach and learn and help each other out to make something we can all be proud of at the end of the semester.
We all came here to learn how to make films and doing a final project like this, culminates everything we have learned thus far. We can all learn from each other as well. Of course there will always be more experienced people and less experienced people on set. But that works in everyones favor to teach and learn and help each other out to make something we can all be proud of at the end of the semester.
Friday, September 7, 2012
First Film.....Old Camera.

My parents bought this 8mm Camcorder H460 in 1991, two years before I was born. from what I have seen from old VHS' is that they would use this camcorder to record family events like Christmas, Thanksgiving, birthdays, etc. When I was born, everything changed. The camera was used for nothing but for my "so called cute baby things I did." When I looked through these old films, I mean what I say that my parents recorded almost every little thing I did. Whether it was walking, sitting, sleeping, singing, laughing, playing, bathing, even going to the bathroom for crying out loud, they recorded every day of my child years till I was 4 when my parents got divorced.
4 or 5 years later, I borrowed the camera from my mother and made my first "movie." I say this in quotation because as a 7 to 8 year old, I just filmed two friends having a light saber battle from the film Star Wars. What wasn't a movie, but a long recording of a fighting scene turns into a "million dollar movie" in the eyes of a child of that age.
Since I was only 7 or 8, I wasn't aware of the different camera shots and angles that I have learned about the past few years. It was only a wide shot with a number of different pans that followed the talents fighting with their green and red light sabers. As much as I look back on it today, I laugh myself thinking "wow, I just made a fantastic scene from a movie and this will make me rich." If I was to record the same exact scene today from the famous franchise of all time, I would definitely be using more of the special camera techniques (shots, angles, etc.) that I have learned thus far in my college career.
Tuesday, September 4, 2012
Shooting on a DSLR
Some videos like "Reverie" by Vincent Laforet, "Tick Tock" by Ien Chi, and most recently Act of Valor really captured my attention. There are a bunch of other short films I have seen on YouTube that are of really good quality and seem really professional. These video as I learn have been shot on DSLR's. What makes them stand out against other affordable cameras is the low light abilities. Other features that I liked is the amount of manual control on them and the ability to put different lenses on the body.
So over spring break I visited the person I interned for in senior year. He runs the TV station in my hometown. So I asked on advice for what type of camera to get, because I wanted my own and an upgrade from my Nikon D3000. The advice he gave me was buy the best body I can afford and then a cheap lens like the Canon 50mm F/1.8. And then for important projects just rent cinema lenses for the high quality. So that is what I did to a degree.
I am starting to learn filming on DSLR's since I got one towards the end of the summer. I've only had two chances to film with it so far. So far I am very pleased with how they turned out and how everything performed. I got a neutral density filter so I can maintain low depth of field and it worked well outside. I was able to do a pretty good job considering I had no tripod or audio equipment, aside from an iPhone. The only thing I really slipped up on was not setting the white balance, but since it wasn't for a project or job I'm ok with that. Also I filmed two quick projects in the same day over a six hour span with unpaid-non-professional talent, so if I took extra time on it, they would have gotten really annoyed.
I am looking forward to what I can produce from this camera, I have high expectations for myself and it. The last thing I want to share is a bit of DSLR humor. http://www.youtube.com/watch?v=bEwUnENlc9M&feature=player_embedded
James Majeau
Subscribe to:
Comments (Atom)